Sometimes a website isn’t too slow, it’s your internet connection that is slow. And You can check the Wi-Fi signal strength to find out the connection performance.

If you’re having issues with your Wi-Fi connection, the strength of your Wi-Fi signal may be poor. Unlike cellular connections, even solid objects such as walls and shelves can sometimes tamper with your WiFi signal strength due to its limited reach and hardware constraints. In this article, we’re going to show you the steps to check Wi-Fi signal strength on Windows 10 with Command Prompt, PowerShell.
How to check Wi-Fi signal strength using taskbar
1- Check Wi-Fi signal strength using Taskbar
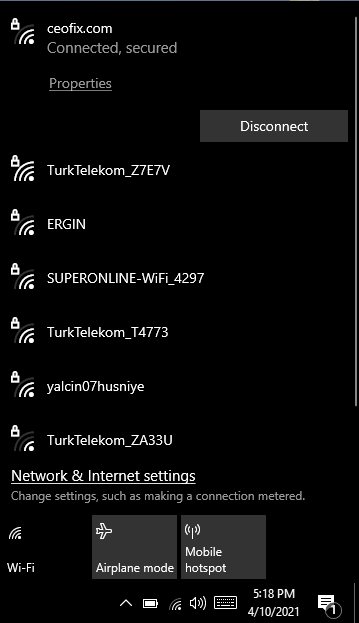
Click at the Wireless Network icon on the taskbar to see the signal strength bars of your current wireless network connection and it will open up the connection’s drawer. The currently connected network would display bars just along with the name. Each bar represents roughly 25% of the signal strength so full bars mean 100% whereas three bars mean 75% .

Note: If you don’t see the wireless icon, the taskbar might have hidden it. Click the up-arrow icon on the taskbar to reveal all hidden icons.
2- Check Wi-Fi signal strength using Settings
Open the “Start” menu and click Settings.
Then click “Network & Internet” .
Here, under the “Network status” section, you’ll see a signal icon. This icon shows your current Wi-Fi network’s signal strength. Again, the more bars that this icon has, the better your signal is.

3- Check Wi-Fi signal strength using Control Panel
Open the “Start” menu, search for “Control Panel,” and click.
Here, click “Network and Internet.”
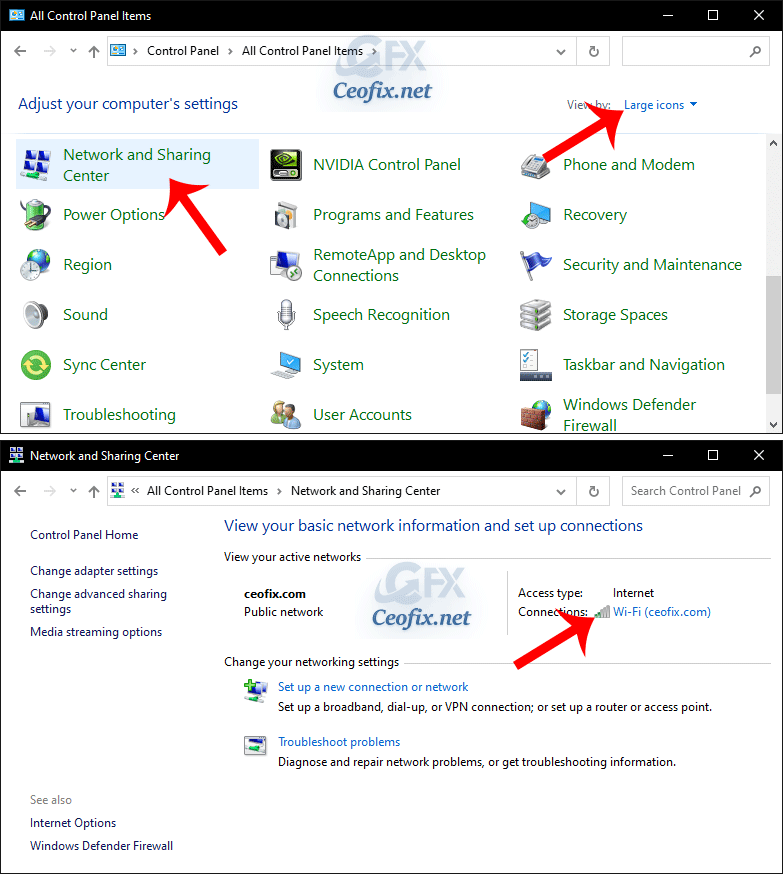
Click “Network and Sharing Center” on the right pane.

Under the “View your active networks” section, the wireless icon next to “Connections” will indicate the signal quality.
Check the WiFi Signal Strength Percentage using Cmd
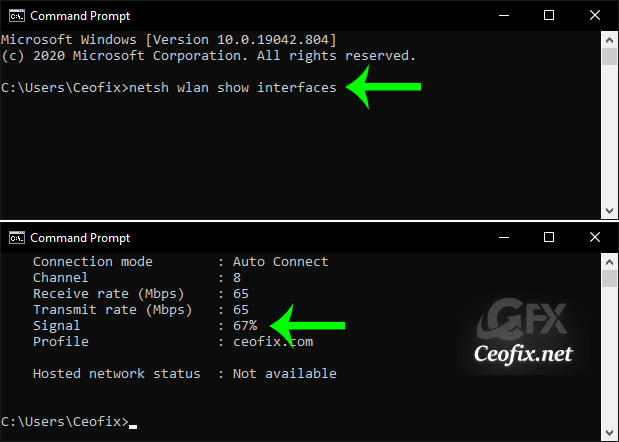
Open the Start menu and type cmd in the search bar. Click on the Command Prompt app to continue.
In your Command Prompt window, type the following command and press “Enter.”
netsh wlan show interfaces

The percentage next to “Signal” is your Wi-Fi signal strength. (If the output number is equal or higher than 80, then the strength of the signal is good.)
Check the WiFi Signal Strength Percentage in Windows 10
Open PowerShell.
Copy and paste the command below into PowerShell, and press Enter.
(netsh wlan show interfaces) -Match '^\s+Signal' -Replace '^\s+Signal\s+:\s+',''
PowerShell only displays a single line output, which shows your current Wi-Fi signal strength in percentage form. (The percentage goes from 0 to 100, where 100 percent indicates excellent signal quality.)

Note: Anything below 60 percent means that you have a weak signal. You should consider moving the device closer to the access point or, buy a new set of network hardware such as the router or Wi-Fi 6 adapter for your computer.
That’s all..
Recommended For You
Three Ways to Forget a WiFi Network in Windows 10 (ceofix.net)
How to check WiFi version on Windows 10 (ceofix.net)
How to Fix Windows 10 WiFi Connected But No Internet Access (ceofix.net)
How to Enable or Disable Wifi in Windows 10 (ceofix.net)
Change Network Profile to Public or Private in Windows 10 (ceofix.net)
No Wi-fi Option in Settings on Windows 10 (ceofix.net)
Published on: Apr 20, 2021-Last edited: 18-06-2023
