Sometimes you get the Wi-Fi option is not showing on the Windows settings. But Why?

Network & Internet category contains options and sections like Wi-Fi, Cellular, Ethernet, etc. But if the WiFi settings are missing in Windows 10, you can’t connect to a wireless network. Some users have reported that out of the there is no Wifi tab in the Network and Internet category of Windows Settings.

This problem arises when your WiFi connection is disabled in the network connection. Here’s how it is fix.
Show Wi-Fi option in settings on windows 10
Open Control Panel and click Network And Internet, and then click Network And Sharing Center.
Now click on Change adapter settings link seen on the left column.
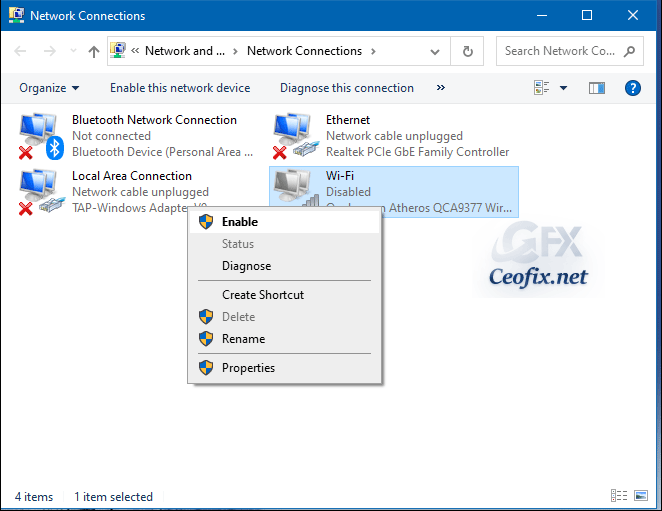
After entering Manage network connections within Network and Sharing Center look for your Wi-Fi connection. Check the status of your network connection. If you disabled and this is why you are unable to see the WiFi section in the Network & Internet Settings.
Therefore right click on your WiFi network and choose Enable.

Alternative Method
1- We have coded a script to make your job easier, just download the Wi-fi-enable.rar file at the end of the page (password:ceofix) and Unzip it.
2- Then simply double-click on the Wi-fi-enable.vbe file Confirm the User Account Control dialog if prompted.
3- It will show a pop-up window with the text “Your Wireless Network connection has been Activated.” Just Click ok button.

Also, Update Wifi Driver or Reinstall Wifi Driver.

There are times where your Wifi driver is corrupted in which case merely updating your driver won’t fix the issue. In such an event, you will have to reinstall your Wifi driver by downloading the driver from your manufacturer’s website.
Ok. That’s all
Recommended For You
Three Ways to Forget a WiFi Network in Windows 10
How to check WiFi version on Windows 10
How to Fix Windows 10 WiFi Connected But No Internet Access
