How to Forget Wi-Fi Network From Your PC in Windows 10. In this article, we’ll show you three ways to forget wireless networks.

When you connect to a new Wi-Fi network all the information about WiFi such as SSID, password or security key, etc is saved. The next time your device comes within the range of these saved networks, it will automatically connect to one of them. However, some wireless networks may change their settings, and you cannot connect using their old profile stored by Windows 10. Also, if you mistyped the WiFi password, you cannot connect to the network. An important step in troubleshooting wireless network issues is to isolate and remove any potential conflicts. For these reasons, you might want to remove the unwanted network from your network list.
important: is absolutely no issue in forgetting saved WiFi network since you can again connect to the same network anytime using the password.
How to forget about Wifi Network in range
Click the Network icon on the lower right corner of your screen. In the list of available wireless networks, locate the one that you want to forget. It can also be the wireless network that you are connected to. Right-click the name of the network you want to remove. Select Forget from the options.

Note: This only works if you’re near the Wi-Fi network and it appears in the list. If you want to remove a Wi-Fi network that is out of your device’s range, you’d have to use the Settings app.
Forget saved Wi-Fi network on Windows 10 using the Settings app
Open Start menu, then click Settings icon or press Windows Key + I to open Settings then click on Network & Internet.
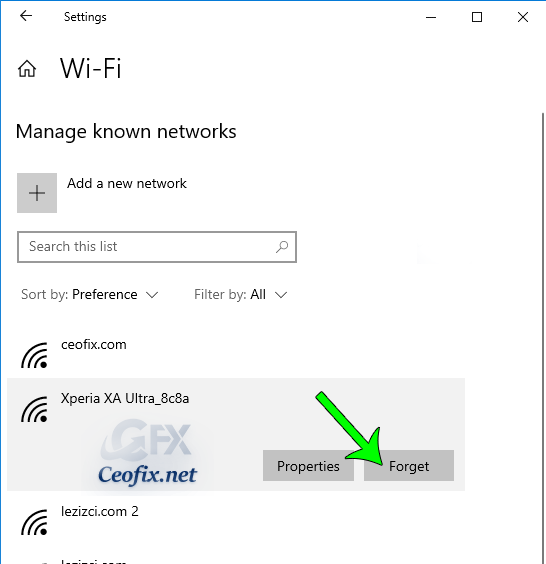
In the column on the left, go to Wi-Fi, and on the right, and click the “Manage known networks” link.

You’ll see a list of every Wi-Fi network you’ve connected to. Click the Wi-Fi network you wish to remove, then select Forget. If the list is too long, you can also search for that network by entering its name in the “Search this list” field.

Alternatively You can prefer to use Command Line Prompt
Important: If you are connected to a WiFi network, your computer or device disconnects from it.
– Open up an elevated command prompt.
-At the command prompt, type the bellow command and press enter
1 | netsh wlan show profiles |

– Choose a wireless network you prefer to delete, for example, you want to delete the SUPERONLINE-WiFi_6440, you can input the following type this command and hit Enter.
1 | netsh wlan delete profile name="SUPERONLINE-WiFi_6440" |
You do not have to remove each network profile one by one.
If you want to remove all networks at once, you can input the following type this command and hit Enter.
1 | netshwlan delete profile name=* i=* |
Windows 10 deletes all the network profiles that it knows, in an instant.
That’s all…
Recommended For You
Quickly Reset Networks Settings in Windows 10
How to check WiFi version on Windows 10
How to Fix Windows 10 WiFi Connected But No Internet Access
Automatically turn on Mobile Hotspot on windows startup
Change Network Profile to Public or Private in Windows 10
How to Enable or Disable Wifi in Windows 10
Fix wireless Connectivity issues Of Windows
How to Forget or Remove a WiFi Network on Android
What Does Airplane Mode Do and Why Should you Use it?
Published on: Dec 23, 2020-Last Edited:05-11-2021
