There are times where you will want to shrink the amount of allocated space on your hard drive, referred to as a volume, to make room for another partition. Example if you need multiple partitions for your business data, you may need to remove or shrink the existing structure or if there is only a C drive on your PC, you can create several new partitions from C drive. Shrinking existing drives or volumes by using in-built shrinking feature through Disk Management, you can create a new drive or volume to place your important data or information separately. Now, we will walk you through how to create new partition from C drive in Windows 10 without formatting . Shrinking a volume is extremely simple and takes only a few minutes. Just follow these few steps.
Shrink partition a basic volume using the Windows Disk Management in Windows 10, 8 and 7
Press the Windows key + R to open the Run box. Type diskmgmt.msc and hit Enter.
diskmgmt.msc

Important!: The “Shrink Volume” option can only produce unallocated space on the right side of the shrunken partition. When you shrink a partition, the Unallocated space can only be created behind it. The Unallocated space shrank from a partition can only be used to create new partitions, it cannot be used to extend another one.
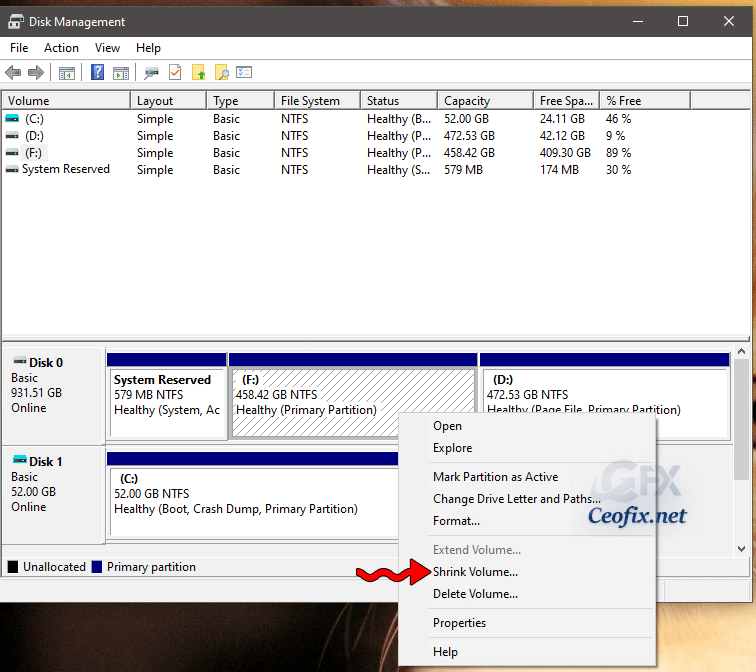
Now right-click on the volume you want to shrink and choose “Shrink Volume”. (See screenshot below)
Note: (F letter ) Normally this is the C drive. (that is the directory where Windows is installed.)

After clicking on the “shrink volume” option, “You will see the following dialog with the following details:
-Total size of the partition before shrink in MB
-Size of available shrink space in MB

For example: If you want to shrink 100 GB, then choose 100000 MB in “Enter the amount of space to shrink in MB”. You can only shrink a partition – volume if it has enough free space. if the partition you want to shrink is full of data, you cannot make it smaller as there is no space left on it to take away. In this case, the “Shrink” option is greyed out.

Once you have made up your mind and decided the amount of space you want to take from the partition, click on the Shrink button and wait for a few seconds for the partition to be shrunk by Windows.

When the process is complete, you will see a new unallocated partition.

Finally, you can use that space to create a new partition.
Published on: Dec 14, 2020-Last edited: 13-02-2022
